Hardenability testing
Abstract
This article explores the concept of steel hardenability and the practical tests used to measure it. Hardenability—the ability of steel to form martensite during quenching—depends primarily on chemical composition, austenite grain size, and alloying element distribution. Since theoretical prediction of hardenability is challenging, metallurgists rely on standardized tests like the Grossman test and the Jominy end-quench test. These methods enable quantitative measurement of hardenability across different steel compositions and quenching conditions. The article details test procedures, interpretation of results, and practical applications for determining critical diameters and predicting hardness distributions in steel components, providing essential knowledge for materials engineers and metallurgists.
Introduction to Steel Hardenability
The rate at which austenite decomposes to form ferrite, pearlite and bainite is dependent on the composition of the steel, as well as on other factors such as the austenite grain size and the degree of homogeneity in the distribution of alloying elements. It is extremely difficult to predict hardenability entirely on basic principles, and reliance is placed on one of several practical tests that allow the hardenability of any steel to be readily determined.
The Grossman Critical Diameter Test
Much of the earlier systematic work on hardenability was done by Grossman and coworkers who developed a test involving the quenching of several cylindrical bars of different diameters in a specific cooling medium. Transverse sections of the different bars, on which hardness measurements have been made, directly show the effect of hardenability.
Figure 1 plots hardness data for an SAE 3140 steel (1.1-1.4% Ni, 0.55-0.75% Cr, 0.40% C) oil-quenched from 815°C. The data shows that full martensitic hardness is only obtained in smaller sections, while for larger diameter bars, the hardness drops off markedly toward the center. The softer and harder regions of the section can also be clearly resolved by etching.
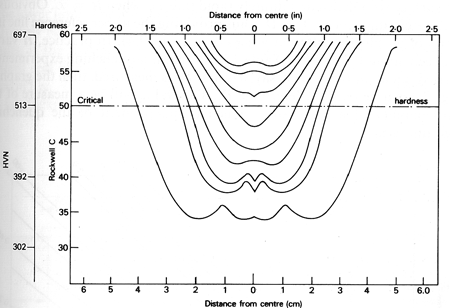
Figure 1: Steel Ni-0.75Cr-0.4C. Hardness data from transverse sections through water-quenched bars of increasing diameter
In the Grossman test, metallurgical examination of transverse sections determines which particular bar has 50% martensite at its center. The diameter of this bar is designated the critical diameter D0. However, this dimension varies with the quenching medium (e.g., water versus oil), so it's necessary to quantitatively assess the effectiveness of different quenching media using H-coefficients. The value for quenching in still water is set at 1 as a standard reference.
Using these H-coefficients, it's possible to determine an ideal critical diameter Di, which represents a bar with 50% martensite at the center when the surface is cooled at an infinitely rapid rate (H = ‡). When H = ‡, D0 = Di, providing an upper reference line for different H-values. In practice, H typically varies between 0.2 and 5.0. If a quenching experiment is conducted at an H-value of 0.4 and D0 is measured, graphs can determine Di—a measure of hardenability independent of the quenching medium used.
The Jominy End-Quench Test
While the Grossman approach to hardenability is very reliable, other less elaborate tests provide valuable hardenability data. Foremost among these is the Jominy test, in which a standardized round bar (25.4 mm diameter, 102 mm long) is heated to the austenitizing temperature, then placed on a rig where one end of the rod is quenched by a standard water jet.
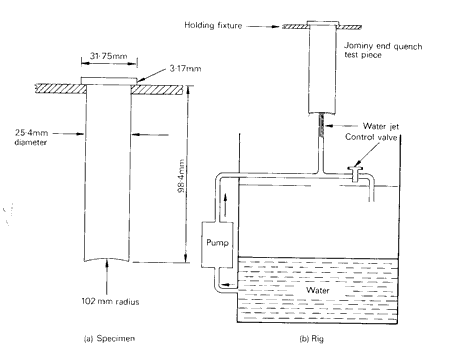
Figure 2: The Jominy test: A - specimen size; B - quenching rig
This method creates a progressive decrease in cooling rate along the bar from the quenched end. The effects are determined by hardness measurements on flats ground 4 mm deep and parallel to the bar axis.
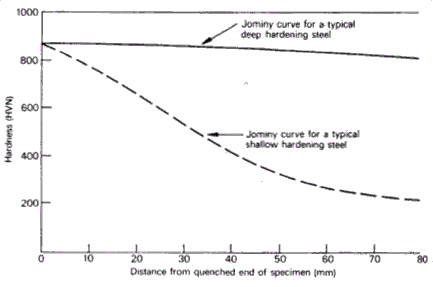
Figure 3: The Jominy and quench test
Figure 3 shows a typical hardness plot for an En 19B steel containing 1% Cr, 0.25% Mo, and 0.4% C. The upper curve represents the hardness obtained with the upper limit of composition for the steel, while the lower curve shows results for the composition at the lower limit. The area between the lines is referred to as a hardenability or Jominy band.
Additional useful data includes the hardness of quenched steels as a function of both carbon content and the proportion of martensite in the structure. This allows easy determination of hardness for 50% martensite at a particular carbon content, and by examining the Jominy test results, the depth at which 50% martensite is achieved can be identified.
The Jominy test is widely used to determine hardenabilities in the range Di = 1-6; beyond this range, the test has limited usefulness.
Practical Applications of Hardenability Data
Jominy test results can be readily converted to determine the largest diameter round bar that can be fully hardened. Figure 4 plots bar diameter against the Jominy positions at which the same cooling rates as those in the centers of bars are obtained for different quenches.
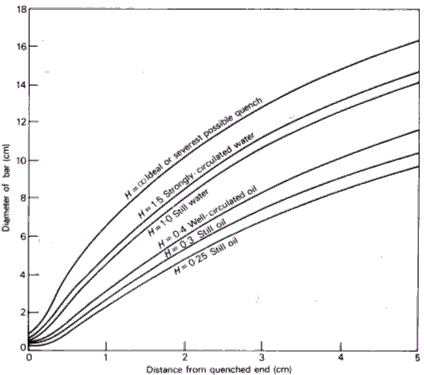
Figure 4: Equivalent Jominy positions and bar diameter, where the cooling rate for the bar center is the same as that for the point in the Jominy specimen
For an ideal quench (H = ‡), the highest curve shows that 12.5 mm along the Jominy bar gives a cooling rate equivalent to that at the center of a 75 mm diameter bar. This diameter reduces to just over 50 mm for a quench in still water (H = 1). For example, with a steel that gives 50% martensite at 19 mm from the quenched end after still oil quenching (H = 0.3), the critical diameter D0 for a round rod will be 51 mm.
Figure 4 can also determine the hardness at the center of a round bar of a particular steel if a Jominy end-quench test has been performed. For instance, if the hardness at the center of a 5 cm diameter bar quenched in still water is required, Figure 3 shows this hardness will be achieved at about 12 mm along the Jominy test specimen from the quenched end. Reference to the Jominy hardness-distance plot then gives the required hardness value. For hardness values at other points in round bars (e.g., surface or half-radius), suitable diagrams are available.
Find Instantly Thousands of Heat Treatment Diagrams!
Total Materia Horizon contains heat treatment details for hundreds of thousands of materials, hardenability diagrams, hardness tempering, TTT and CCT diagrams, and much more.
Get a FREE test account at Total Materia Horizon and join a community of over 500,000 users from more than 120 countries.