Charpy Impact Steel Testing: Part One
Abstract
The Charpy V-notch (CVN) impact test is a standardized method for measuring material toughness through impact energy absorption during fracture. This test employs a pendulum-based system to evaluate how materials respond to sudden impact forces, particularly crucial for applications in pressure vessels and bridge construction. The test utilizes a notched specimen and measures energy absorption through pendulum displacement, providing vital data about material behavior across different temperatures. This article explores the test methodology, standards, variables affecting results, and its significance in determining ductile-to-brittle transition characteristics in materials.
Introduction to Charpy Impact Testing
The Charpy V-notch impact test stands as a fundamental method in materials testing, providing critical data about material behavior under impact loading conditions. This standardized procedure measures the energy absorbed during material fracture, offering insights into material toughness and durability.
Test Methodology and Standards
The test follows specific international standards, primarily BS EN ISO 148-1:2009 (British Standard) and ASTM E23 (American Standard). These standards differ mainly in striker specifications but maintain consistent specimen dimensions: 55 mm length, 10 mm square cross-section, with a 2 mm deep notch featuring a 0.25 mm tip radius.

Figure 1: Standard Charpy-V notch specimen
Test Procedure and Equipment
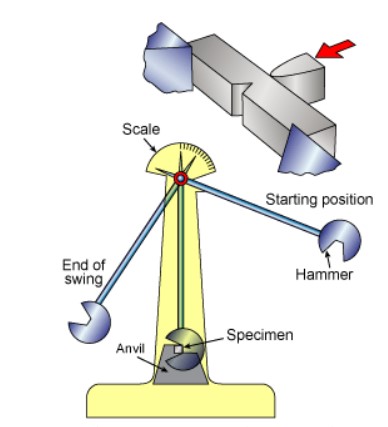
The testing process involves mounting a standardized specimen on an anvil support system, with the notched face positioned away from the striking pendulum. The pendulum's impact fractures the specimen, and the final swing height indicates the energy absorbed during fracture.

Figure 2: The Charpy testing machine
Variables and Result Interpretation
Several factors influence test results, including:
- Specimen characteristics (notch geometry, grain structure, chemical composition)
- System parameters (machine calibration, friction)
- Environmental conditions (temperature control)
- Procedural aspects (operator technique)
Temperature Effects and Transition Behavior
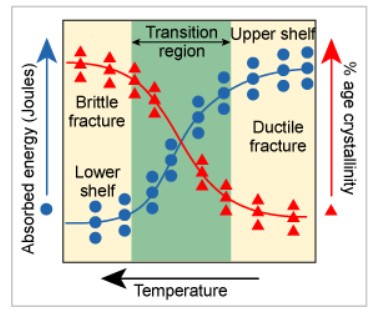
A distinctive feature of carbon and low alloy steels is their temperature-dependent fracture behavior. When tested across various temperatures, these materials exhibit a characteristic 'S' curve showing the transition from ductile to brittle fracture.

Figure 3: Schematic Charpy-V energy and % age crystallinity curves
Read more
Find Instantly Precise Material Properties!
Total Materia Horizon contains mechanical and physical properties for hundreds of thousands of materials, for different temperatures, conditions and heat treatments, and much more.

Get a FREE test account at Total Materia Horizon and join a community of over 500,000 users from more than 120 countries.