Nondestructive Testing in the Steel Industry: Part Two
Abstract
Nondestructive material testing with ultrasonic equipment is more than 40 years old. From the very first examinations, using ultrasonic oscillations for detection of flaws in different materials, it has become a classical test method based on measurements with due regard to all the important influencing factors. Nowadays it is expected that ultrasonic testing, supported by great advances in the technology of instruments, gives reproducible test results within narrow tolerances. This assumes exact knowledge of the influencing factors and the ability to apply these in testing technology.
Ultrasonic Testing (UT)
Nondestructive material testing with ultrasonic is more than 40 years old. From the very first examinations, using ultrasonic oscillations for detection of flaws in different materials, it has become a classical test method based on measurements with due regard to all the important influencing factors. Nowadays it is expected that ultrasonic testing, supported by great advances in the technology of instruments, gives reproducible test results within narrow tolerances. This assumes exact knowledge of the influencing factors and the ability to apply these in testing technology.
Not all influences have to be seriously regarded by the operator. In many cases some of the influences can be neglected without exceeding the permitted measurement tolerances, which simplifies the test sequence and reduces the testing time. Despite this, the future belongs to qualified operators who carry out their task responsibly and who continuously endeavor to keep their knowledge at the latest state of the art.
At the beginning of the fifties the technician only knew radiography (x-ray or radioactive isotopes) as a method for detection of internal flaws in addition to the methods for nondestructive testing of material surfaces, e.g. the dye penetrant and magnetic particle method. After the Second World War the ultrasonic method, as described by Sokolovin 1935 and applied by Firestonein 1940, was further developed, so very soon instruments were available for ultrasonic testing of materials. The ultrasonic principle is based on the fact that solid materials are good conductors of sound waves. Whereby the waves are not only reflected at the interfaces but also by internal flaws (material separations, inclusions etc.), the interaction effect of sound waves with the material is stronger the smaller the wave length, this means the higher the frequency of the wave.
This means that ultrasonic waves must be used in a frequency range between about 0.5 MHz and 25 MHz and that the resulting wave length is in mm. With lower frequencies, the interaction effect of the waves with internal flaws would be so small that detection becomes questionable. Both test methods, radiography and ultrasonic testing, are the most frequently used methods of testing different test pieces for internal flaws, partly covering the application range and partly extending it. This means that today many volume tests are possible with the more economical and non-risk ultrasonic test method, on the other hand special test problems are solved, the same as before, using radiography. In cases where the highest safety requirements are demanded (e.g. nuclear power plants, aerospace industry) both methods are used.
Acoustic emission instruments and noise detectors are non-destructive testing (NDT) equipment for monitoring conditions and detecting changes in mechanical, electrical and process systems. Acoustic emission instruments are used to detect shorting or arcing in electrical power distribution systems. In mechanical systems, flaws also provide specific acoustic or vibrational responses. For example, if a break, deformation or other failure occurs, acoustic emission sensors can detect the burst of high frequency caused by the event. Noise detectors are used to detect leaks or changes in process components such as steam traps, pipes, valves, and pressure vessels.
Ultrasonic (UT) noise detectors can identify changes in bearings, gearboxes, and rotating machinery due to changes in wear or load. Other ultrasonic inspection methods such as the pulse-echo technique detect flaws and estimate sizes by comparing the amplitude of a reflected echo from an interface with that of a reference interface of known size.
Eddy current instruments are nondestructive testing (NDT) equipment used to induce detectable eddy currents in conductive materials. They detect flaws, determine thickness, inspect welds, measure conductivity, and sort alloys. Eddy current instruments include a straight or angled magnetic probe and an analog or digital meter with a zero reference point. Moving the magnetic probe over the surface of a conductive material such as a metal tube induces circulating currents (eddies) of electrons that oppose the externally applied magnetic field from the probe. Surface irregularities such as cracks and corrosion interrupt the surface flow of eddy currents and are detected.
Infrared (IR) and radiographic nondestructive testing (NDT) equipment is used to determine the thickness or basis weight of webs, sheet materials, or coatings. With nonmetallic materials such as plastic films or webs, radiation is reflected back or transmitted in order to determine absorption levels. Increases in mass, density, or thickness result in increased absorption.
Gauges are often calibrated with samples of a known thickness, density, or mass. Equipment that uses penetrating X-rays or gamma rays is commonly available. Densitometers are used to quantity the density variants in X-ray images. Penetrameters or other X-ray opaque gage references are positioned with the part during imaging for sizing internal cracks, pores, defects and other features.
Penetrant testing systems are non-destructive testing (NDT) equipment that detects discontinuities in the surface of components. Parts are sprayed with aerosols, immersed in liquids, or dusted with powders. Capillary action pulls the penetrant into surface flaws. Next, a cleaner is used to remove the residual surface penetrant from the part that the only penetrant that remains is in the flaws or cracks. Many non-destructive testing (NDT) penetrant systems are available. Red dye penetrants are visible under normal light. Fluorescent penetrants may require ultraviolet (UV) light or backlight illumination.
Finished product quality control
Requirements in this area for flat and long products include:
- internal quality - presence inclusions or clusters of inclusions, cracks, microstructure hetererogeneities
- surface condition - surface defects, surface cracks, underskin defects, roughness, brightness,
- dimensional properties - length, width, shape, evenness, straightness, thickness and thickness profile,
- product sorting and characterization in accordance with applications properties, and
- uniformity of mechanical properties.
The importance of these criteria depends on the type of product and its applications. However, the size of limit defects is decreasing; manufacturers are now regularly required to detect inclusions and clusters of inclusions approximately 20 µm in size in structural steel bars, clusters of inclusions of several tens micrometers in thin plate for deep-drawing and scratches a few millimeters long in stainless steel plate for decorative or flatware applications. Checking of sheet properties uniformity is required for customers to be able to use automatic machines; again the dispersion of tolerances required is decreasing.
Final product quality must be ensured by suitable and stringent process control taking into account the main manufacturing parameters and based on reliable instrumentation. However, processes are sometimes so complex that it may be more advantageous --if not indispensable-- to verify correct equipment operation and process implementation by testing the product itself. This should take place as far upstream in the process as possible to enable appropriate measures to be taken in the event of drift, to rework semi-finished products as soon as a problem is detected, and to maintain uninterrupted metal flow by ensuring that the semi-finished product can follow the normal manufacturing process without a risk of damage to down-stream equipment and resulting poor quality of the finished product. Substantial savings can be realized in this way.
An example are hot-slab eddy current examination facilities located at the end of continuous casting line. These facilities are used for in-process detection of serious cracks; they enable sound products to be sent to the strip rolling mills without cooling, and the plant in question has as a result been able to close its manual crack repair line.
Another example is that of testing internal hot slab and bloom quality using ultrasonic techniques. Ultrasound waves have been transmitted through the product via the rolling mill or continuous casting machine rolls. Again, significant savings were realized and the testing facility break-even point was soon reached.
For both final quality control and intermediate testing, given the constant improvement in product quality resulting from ever better process control and characterized by decreasing defects, simple statistical testing is no longer sufficient; exhausting testing or at least testing of a major part of the production is needed. Only in certain cases, such as detection of very small inclusions, sampling can be sufficient when there is a lack of better techniques.
Testing should be done in-process and suited to continuous production lines, taking into account process and environmental considerations, in particular product flow speed.
Applications
As mentioned previously, with today’s standards for quality and production efficiency more than mere temperature measurement is needed to produce good steel. Continuous efforts on the improvement of product quality and the need to meet customer requirements mean that nondestructive testing methods continue to be the subject of extensive development efforts in the steel industry. Development is being directed towards the use of these techniques as a measurement tool and as a means of characterizing steel application properties.
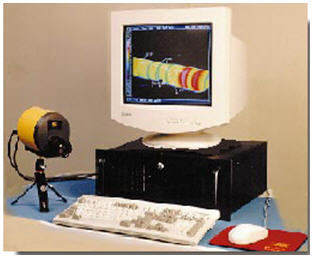
An industry leader in infrared thermal imaging technology, Mikron Instruments from USA supplies high speed, high accuracy, high resolution systems for process control, predictive maintenance, nondestructive testing and laboratory research. The Pyrovision M9103 Series Imaging Pyrometer was designed specifically for high temperature steel industrial applications.

Figure 1: Pyrovision software, the M9103 system
Typical applications include:
- Annealing furnaces
- Continuous casting
- Forging and ring rolling
- Heat-treating furnaces
- Induction heating
- Electron-beam and plasma-arc melting furnaces
- Refining furnaces
- Reheat furnaces
With powerful Pyrovision software, the M9103 system can:
- Detect slag
- Monitor continuous cast streams and control water-spray
- Provide early warning of breakout conditions
- Monitor cooling rates
- Identify heating zones and cold spots in reheat furnaces
- Monitor burner activity
- Identify door leakage in furnaces
- Monitor billet heating
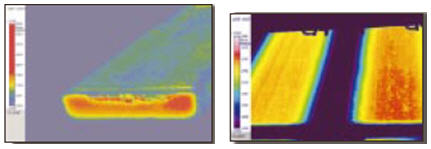
Figure 2 shows imaging and temperature profiling of slab during continuous casting and hot-rolling process as a flat products.

Figure 2: Temperature profiling of slab during continuous casting and hot-rolling process as a flat products
As shown in Figure 2, the corner "break-outs" can be the result of inadequately cooled strands on the caster, or the loss of dimensional control and necessary metallurgical characteristics in rolled stock. The M9103 with its accurate hot edge detection imaging and temperature profiling capabilities can control continuous casting better than any other method.
Find Instantly Precise Material Properties!
Total Materia Horizon contains mechanical and physical properties for hundreds of thousands of materials, for different temperatures, conditions and heat treatments, and much more.

Get a FREE test account at Total Materia Horizon and join a community of over 500,000 users from more than 120 countries.