Mechanical Properties of Metals
Abstract
This comprehensive article explores the fundamental mechanical properties of metals, focusing on strength, hardness, ductility, and impact resistance. It details various testing methods including tensile testing, hardness measurements, and impact resistance evaluations. The article explains how these properties are measured, calculated, and applied in engineering applications, providing essential information for material selection and design considerations. Special attention is given to testing procedures and standardized measurements used in industry.
Introduction to Mechanical Properties
The mechanical properties of metals determine their range of usefulness and establish the expected service life. These properties are crucial for specifying and identifying metals, with the most significant being strength, hardness, ductility, and impact resistance.
Metal Strength Testing and Measurement
Strength represents a metal's ability to withstand external forces without breaking. Tensile strength, also called ultimate strength, is the maximum strength developed in a metal in a tension test. The tension test determines the behavior of a metal under actual stretch loading, providing data on elastic limit, elongation, yield point, yield strength, tensile strength, and reduction in area. While typically conducted at room temperature, these tests can also be performed at elevated temperatures.

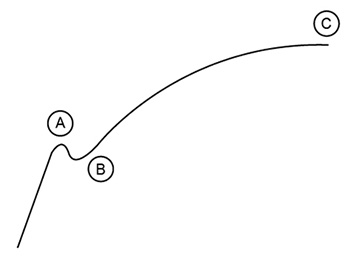
Figure 1: Stress-Strain Curve Diagram
Tensile testing machines typically plot curves showing load/stress against strain/movement during testing. The specimen elongates in direct proportion to the tensile load during the elastic portion of the curve to point A. At this point, elongation continues without load increase, marking the steel's yield point and the elastic portion's end. Up to point A, removing the load allows the specimen to return to its original dimensions.
Yielding occurs from point A to point B, representing the plastic deformation area. Load removal at point B results in permanent dimensional change. Beyond point B, increased load is necessary for further stretching. The load increases to point C, representing the material's ultimate strength, where the specimen breaks.
Ultimate tensile strength is calculated by dividing the ultimate load by the original specimen's cross-sectional area, expressed in Newtons per square millimeter (Mega Pascals, MPa) or pounds per square inch. The yield stress is determined by dividing the load at point A by the original area. For extremely ductile metals without a distinct yield point, yield is determined at 0.2% elongation.
Ductility and Reduction of Area
Ductility is the property allowing metals to be stretched or shaped without breaking while retaining the changed shape after load removal. It's measured by determining elongation percentage, using gauge marks two inches apart across the expected fracture point. The percentage is calculated by comparing the final length to the original length.
Reduction of area, another ductility measure, compares the original cross-sectional area to the area after failure. For round specimens, diameter measurements before and after testing allow calculation of the percentage reduction in area. While less critical than elongation, this measurement is typically included in mechanical property reports.
The tensile test also provides the modulus of elasticity (Young's modulus), representing the ratio of stress to elastic strain, crucial for design calculations.
Hardness Testing Methods
Hardness is defined as the resistance of a metal to local penetration by harder substance. The hardness of metals is measured by forcing a hardened steel ball or diamond into the surface of the specimen, under a definite weight, in a hardness testing machine.
The Brinell is one of the more popular types of machines for measuring hardness. It provides a Brinell hardness number (BHN), which is in kilograms per square millimeter based on the load applied to the hardened ball in kilograms and divided by the area of the impression left by the ball in square millimeters.
There are several other hardness measuring systems:
- Rockwell hardness tester: Utilizes a diamond that is forced into the surface of the specimen. Different loads are used to provide different scales, with smaller loads used for softer materials.
- Vickers hardness machine: Reads directly as a diamond is pressed into the surface of the metal.
- Shore scleroscope: Utilizes a small, dropped weight which will bounce from the surface of the metal providing a hardness measure.
Impact Resistance Evaluation
Resistance of a metal to impacts is evaluated in terms of impact strength. A metal may possess satisfactory ductility under static loads but may fail under dynamic loads or impact.
Impact strength is most often determined by the Charpy test, though it is sometimes measured by the Izod test. Both types of tests use the same type of pendulum-testing machine. The Charpy test specimen is a beam supported at both ends and contains a notch in the center. The specimen is placed on supports and struck with a pendulum on the side opposite the notch. The accuracy and location of the notch is of extreme importance. There are several types of Charpy specimens; the V-notch type is the most popular.
The impact strength of a metal is determined by measuring the energy absorbed in the fracture. This is equal to the weight of the pendulum times the height at which the pendulum is released and the height to which the pendulum swings after it has struck the specimen. Impact resistance is measured in two ways:
- Metric measurements:
- In Joules based on energy absorbed
- In Joules per square centimeter of the area of the fractured surface or the cross-sectional area under the notch
- Anglo-Saxon measurements: In foot pounds of energy absorbed
Find Instantly Precise Material Properties!
Total Materia Horizon contains mechanical and physical properties for hundreds of thousands of materials, for different temperatures, conditions and heat treatments, and much more.

Get a FREE test account at Total Materia Horizon and join a community of over 500,000 users from more than 120 countries.